Tuesday, September 29, 2015

Lasagna Soup & Cheesy Garlic Bread

It's a nasty day at home. The weather can only be described as gross. It's misty raining and foggy. We are snuggled up on the couch and enjoying a super simple (but super delicious!) meal, created by things we had already in our pantry. I had seen some Lasagna Soup recipes on Pinterest while pretending I didn't need to clean the house on my afternoon off, so I decided to give it a try! And yes, I actually cooked tonight!

Lasagna Soup

Ingredients
Olive Oil
1 lb ground beef
Black Pepper
Red Pepper Flakes
3 cloves minced garlic
4 cup Low-Sodium Chicken Broth
1 (14.5 oz) Can Petite Diced Tomatoes
1 (14.5 oz) Can Crushed Tomatoes
2.5 Tbsp tomato paste
1 3/4 tsp basil
3/4 tsp oregano
1/2 tsp rosemary
1/2 tsp fennel seeds
1/2 tsp thyme
1 tsp sugar
1.5 Tbsp parsley (plus more for garnish)
8 lasagna noodles, broken into bite-sized pieces
1 1/4 cups shredded mozzarella cheese
1/2 cup shredded parmesan cheese
8 oz ricotta cheese

Directions:
1. Measure out basil, oregano, rosemary, fennel seeds, thyme, sugar, and parsley. Put together in a ramekin and set to the side.
2. Pour 1 Tbsp olive oil into a pan and warm on medium high heat. Crumble and brown beef. Add 2-3 large pinches black pepper and several pinches (to taste) of red pepper flakes. Once browned, pour beef out onto paper-towel lined serving platter or large bowl.
3. Add another 1 Tbsp olive oil into the pan. Toss in minced garlic and sauté for about 30 seconds.
4. Pour in chicken broth, diced tomatoes, crushed tomatoes, and tomato paste. Stir, making sure to scrape the bottom of the pot to get the delicious flavor from the beef off the bottom!
5. Pour in the pre-measured spices and ground beef. Bring to boil and then reduce the heat to low or medium-low. Allow soup to simmer, covered for 20 minutes.
6. Cook broken up lasagna noodles according to package.
7. Drain pasta once cooked and add into the soup mixture.
8. Mix together Ricotta, Parmesan, and Mozzarella cheese.
9. Serve up soup and place a heaping tablespoon of the cheese mixture on top. Sprinkle extra parsley on top! Enjoy with cheesy garlic bread (recipe below!)

Cheesy Garlic Bread

Ingredients:
Block/Wedge of Asiago Cheese
Sub Roll bread/French Bread/Any loaf bread you have at home
Garlic Powder

Directions:
1. Preheat oven to 375.
2. Shred a large amount of Asiago cheese (We had a wedge and I shredded the entire wedge).
3. Take a heaping Tablespoon of garlic powder and mix well with the cheese.
4. Slice bread in half lengthwise.
5. Lay bread out on baking sheet. Put 1/4 of cheesy garlic mix onto each slice.
6. Cook at 375 for 10-12 minutes until cheese is golden brown.

Tuesday, September 8, 2015

Labor Day Lunching

It's Labor Day weekend, which means cookouts, grilling, and beer. I'm fortunate enough to have married into a family that has an "in" in the BBQ world (If you're in or near Albertville, AL - check out Wilson's BBQ!). My Father-in-law owns a barbecue restaurant, so we get barbecue (and good barbecue at that!) for all of the appropriate holidays - Memorial Day, 4th of July, Labor Day. I love barbecue, but I get bored easily. That's when I get my "great ideas," which J then implements in the kitchen. This Labor Day, I got the idea to do a twist on the classic barbecue sandwich. It's sort of a combination of a melt and a barbecue sandwich (you look confused - bear with me!).  It ended up being one of the most delicious ways I have ever enjoyed barbecue (and we even had it at our wedding reception!). It's super easy, makes a quick meal, and is quite filling!

Ingredients:
Sweet Baby Ray's BBQ Sauce
Mayo
Cheddar Cheese
Romano Cheese
Barbecue (about 1/4 pound per person)
Coleslaw (premade or homemade will work!)
A stick of butter
Bread (we used honey wheat)

Directions:
1. Mix 1/3 cup BBQ sauce and 1/3 cup mayonnaise together in a bowl. Blend with whisk until smooth. It'll look a bit like chocolate - definitely deceiving!

2.  Take the stick of butter, peel back the wrapper and wipe it across a warmed pan several times, making sure to grease the entire pan surface. Lay down 2 slices of bread per person.
3. Slather a decent amount of the barbecue/mayo mix on each slice.
4. Pile 1/4 pound of barbecue on 1 slice and another 1/4 pound of barbecue on another slice. 
5. Add a mixture of cheddar cheese and Romano cheese on the 2 remaining slices.
6. Pop pan into a 450 degree oven for 7-10 minutes, until cheese is melted and the corners of the bread are golden brown.
7. Pile coleslaw on top of the barbecue meat.
8. Put the sandwiches together. 
9. ENJOY! We served ours with sides of fresh watermelon, baked beans, and potato salad! YUM! 

Sunday, September 6, 2015

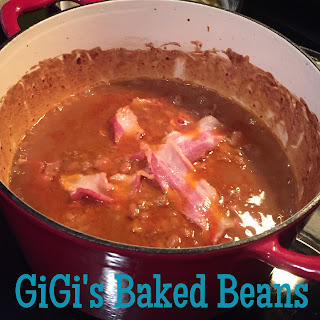
GiGi's Baked Beans

There's nothing quite as comforting as family recipes. It takes me back to my childhood, fills my belly, and warms and comforts my soul. J loves to cook family recipes. He apparently likes the pressure of trying to measure up to my mom's (grandma's, Mimi's, or aunts') cooking. I'm not complaining. It means that I get all the comforts of my childhood home in my own home. My mom's baked beans recipe are definitely a go-to recipe anytime we have to take a side dish to a potluck or need a quick, easy side for dinner (like a Labor Day BBQ!). We have put our own (very slight) twist on the recipe to make it a bit more hearty, but there's still nothing like the original. T calls my mom "GiGi," so we have renamed this recipe "GiGi's baked beans" at my house. These also heat up nicely on a cold day and make an amazing hand/heart/soul/belly warming dish!

What You'll Need:
1 Tbsp Butter
1 clove garlic, minced
1/2 pound ground beef
3 Tbsp Ketchup
1 tsp Mustard
1 Tbsp brown sugar
2 tsp Worcestershire sauce
Hot sauce (just a few dashes)
2 pounds of beans (fresh, homemade or canned is fine, as well!)
4 strips of bacon

Instructions:
1. Preheat oven to 450 degrees.
2. In a Dutch Oven, melt one Tbsp of butter over medium low heat and allow the minced garlic to simmer in the butter for a few minutes.
3. Add ground beef and cook until browned.
4. Once beef is browned, add the remaining liquid ingredients and stir together.
5. Take 2 of the strips of bacon and cut into 1/4 inch wide slices. Stir into bean mixture.
6. Top with the 2 remaining slices of bacon. Place lid on Dutch Oven and cook for 25-30 minutes. If you don't have a Dutch Oven, a regular 3 qt. baking dish will work!

7. Allow to cool for 10 minutes, serve, and enjoy!

I hope you enjoy my mom's baked beans as much as we do! Take it to the next potluck you're invited to. I promise you, they'll be a crowd pleaser!

Frying Up Happiness

Ok, as we have established, I am from the South (yes, with a capital S).  Eating fried items is in my
blood, along with sweet tea, rocking chairs on the front porch, and moonshine.  Of course, it has to be done RIGHT - which means, homemade! This Labor Day weekend, T and I were starving. J was not in the mood to cook just yet as he was seasoning his cast iron skillets. Being the kind man he is, he took a brief pause and made us some fried pickles with spicy fry sauce. T and I both love pickles, so J made 2 very happy (much less hungry) campers.

Fried Pickles:
1. Drain 1 jar of pickles (or more - I generally use 1 jar of pickles chips per 3 people), and lay the chips out in a single layer on some paper towels. Using another paper towel, pat the chips fairly dry.
2. Sift 1/2 cup flour, 2 tsp cajun seasoning, 1 tsp Italian seasoning, 1/4 tsp Cayenne pepper into a bowl. This mixture will accomodate 1.5-2 jars of pickles
3. Preheat vegetable oil in a skillet to 375 degrees.
4. In small batches (12-15 pickles), dredge the pickles in the flour mixture and drop them in the hot oil. Allow them to cook for 2 minutes, or until golden brown.
5. Scoop pickles out of the oil and place on a paper towel covered plate to drain the excess oil off.
6. Allow the oil to return to 375 degrees and then repeat the process.

Spicy Fry Sauce (adapted from The Pioneer Woman's Fry Sauce Recipe)
1/2 Cup Ketchup
1/2 Cup Mayo
Hot sauce to taste (We start with 1 tsp and add in 1 tsp increments)
Pinch (or 2 or 3) of black pepper.

**For an awesome spread for BBQ sandwiches, substitute BBQ sauce for Ketchup.

Alternative Spicy Dipping Sauce:
1/2 Cup Texas Pete Buffalo Sauce
1/2 Cup Blue Cheese Dressing
Salt & Pepper to taste.

Tuesday, May 12, 2015

My Team

First and foremost: Oh. My. Goodness. It is absolutely ridiculous how long it has been since I wrote a blog post! I truly apologize for that. Good news is: we have plenty to cover! Bad News Is: I have missed you all! Moving On...

It takes a village to raise a child. It takes a team to make a celebrity red-carpet-ready. Well, it takes
multiple planners to keep me on track! I am not kidding! Jump on instagram and search some tags like "plannernerd" or "plannerjunkie." You will see that I am not alone! I have three planners. Yes, three. However, they all serve a slightly different purpose. If you think that's a lot, (again) hop on instagram and see just how many women join me in utilizing more than 1 planner! So what all do I use these for? I am so glad you asked!

1. My FoxyDori, made by Kelly - one of the sweetest Etsy sellers you will ever meet. It's fuschia (she calls it DragonFruit. Who cares?! It's gorgeous!), with my initials in the bottom right corner....Perfection.
So, What's In It? My MayDesigns notebooks, all of which serve their own individual purpose. This planner is all about me: my schedule, personal goals, personal to-do list, etc.. And it goes everywhere with me.

  • An Agenda: This helps me keep track of the most important parts of my day (to do lists, errands, things to remember, etc.)
  • An Address Book: Sometimes, I have a card in my purse to mail, but I have forgotten to write (or finish writing) the address. This is where my on-the-go address book comes in handy!
  • A Meal Planner: This includes a weekly space to write out the meals for each day, and another space to write out my grocery list! So handy.
  • A Budget Book: I'm terrible about writing out expenses AFTER I get home. I usually end up shredding the receipts before I remember to write them down in my check register or my budget tracker. This allows me to keep up with expenses WHEN they happen!
  • A Notebook: This is just plain lined notebook paper. I use this to write down to-do lists, doodle, or even write important info given to me while I'm on the go.

2. My Erin Condren Life Planner. This planner is a little more broad in terms of what I write in it/plan in it. This is more of a "family" planner, but still is mostly focused on my personal daily to-do lists. I plan out any important events for J (my hubby) or T (my stepson) in here as well. Family member's birthdays, as well as their important events are noted in here as well. This planner frequently makes an appearance out in public with me, but doesn't necessarily travel everywhere I go.

  • Weekly Spreads Include: Birthdays, daily to-do lists, errands to run, doctors' appointments, work check lists, my daily work schedule, reminders, etc.
  • Monthly Spreads Include: Birthdays, Big events (i.e., anniversaries, graduations), vacations/trips, when my stepson visits, my husband's retreats. I also use my notes section on each month to track my PTO so that I make sure I don't go over!

3. My Inkwell Press Planner. This is truly a family planner. It lives on my bartop in my kitchen. This has everything going on in our family in one place: J's work schedule, my work schedule, T's visits, J's Honey-Do list, my goals for around the house each week, meal plans, work out goals, etc.. What I really love about this planner is the extra notes pages after each month and the goals page included each month. It's great for a business-minded woman (OR a woman on a mission to get out of debt!). While mine is not personalized on the cover, it does generally come with personalization. I ordered mine on sale when personalization was no longer offered.

  • Weekly Spreads Include: Both of our work schedules broken down by time each day, dinner plan, work out plan, pay days, honey-do list, errands to run, and weekly goals for around the house.
  • Monthly Spreads Include: Pay Days (we get paid on different days of the month), T's visits, big events, J's retreats, our vacations, my call weekends, etc. 

See?! It really does take a village to keep me on track!  Hopefully, this helps provide you with some inspiration on how to utilize multiple planners. My recommendation is to make your smallest planner your go-to on-the-go planner with your larger planners being more flexible to stay at home. If you like my magnetic clips, check out OliClip on etsy. Like the stickers you see?! Check out my instagram (@mrshenleyplans) for vendors or stay tuned for a new weekly blog feature (Coming Soon!): My Favorite Etsy Vendors.

Thanks for stopping by!

Sunday, December 14, 2014

Orgainzing Your Planner Stickers

I saw this idea initially on Instagram from someone in the planner community for Erin Condren lovers like myself. I couldn't resist jumping on the bandwagon as my current system of storing planner stickers is to pile them up in a tupperware container. SO not conducive to finding something quickly. I searched high and low online trying to find something that I liked (as I am super lazy and hate shopping/running errands), but had no success. I then ventured out to my local Target and OfficeMax as Staples wasn't an option in my neck of the woods. I have outlined below the products I used, along with where I found them. 


What You Will Need:
Avery 7x9 1" 3-ring binder
Avery 5 1/2x8 1/2 inch Sheet Protectors
Avery 5 1/2x8 1/2 inch business card holders


How to Organize:
1. Separate stickers by vendor. To me, I generally think "Oh I wish I could find these from this shop." So organizing by etsy seller was easiest for me. However, you may choose to organize your stickers by category, what you use them for, etc..
Some labelled & filled page protectors
2. I labeled each page protector with one of my favorite stores. I made sure to write them on the outside portion and made sure to stagger them so I could see the labels a bit easier. Once labelled, I dropped the respective stickers into their protector and popped it into my notebook!
Some Lillie Henry stickers in their page protector.
3. Once my page protectors were filled with the larger sheets of stickers, I moved on to filling the business card holders. I used these for stickers bought in-store (i.e., Target, Michaels, etc.), page flags from target, and some washi samples. If something was a little too long or tall, I trimmed the excess to help it fit a bits better.
My page flag-filled business card holder.
Some stickers and washi samples.
4. Once I had filled all of my business card holders, as well, I created a dash board for my sticky notes on the back part of the binder, using the binder itself. Some of my thicker sticky note pads didn't make "the cut," as they would have made the binder outrageously thick.
My dashboard in my sticker binder! Dreams do come true!
5. My completed project, chock full of planner goodies!!! 

The biggest key to making this work for you is to find and use a system that makes sense to you! Happy planning and organizing! :)

Want more of what you see?? Follow my on instagram: @mrshenleyplans

Sunday, November 9, 2014

7 Minutes to a Fresh Face!

We are all busy! Unfortunately, between getting hubby and kids out the door, we ladies often neglect ourselves. No more! Getting a simple, but fresh, clean make-up is super easy. It doesn't require a lot of time, either! It can be as simple or as fancy as you want! I have literally nailed my make-up routine down to 7 minutes (or less!). Want to know how?! You're in luck!

1. Foundation: I have 3 "favorites" that I rotate between. I have a slight system that determines which foundation I use. If I'm just throwing on make-up for work, I use E.L.F. High Definition Powder. I really like it because it keeps me from getting shiny during the day while running around the hospital or the office (and it provides a simple base for my make-up that doesn't make me look pale or too yellow!). If I'm going for a more finished look (like for date night or drinks with friends), I'll use MAC Studio Fix Pressed Powder Foundation. It makes my skin look amazing and it provides a flawless finish! If I'm going to a super fancy event where lots of pictures are going to be taken (i.e. a wedding), I use my Younique BB Cream. It really evens out skin tones so that you don't look splotchy with all the bright flashes from the camera!

2. Blush: I used to be a Clinique girl, but then I discovered Revlon Matte Powder blush at Target. Way cheaper, and it works just as well as Clinique blush. When I first started learning how to apply make-up, a consultant for Mark Kay told me that the best tool a girl can have in her make-up bag is her make-up brushes! I love the brushes by E.L.F.. They are fairly inexpensive, but work really well. I use the E.L.F Blush Brush to apply my blush.

3. Mascara: I also have 3 options depending on the look I am going for. Generally, I wear my Younique 3D Fiber Lash mascara. It makes my lashes look ridiculously long and full! It's almost as if I am wearing fake lashes, but they are mine! If I'm going to a pool party, I'm all about the waterproof mascara (just incase I get in the pool!). I love Rimmel London ScandalEyes (Waterproof version!). Sometimes, if I want a little extra thickness to my lashes as the base for my Younique Mascara, I apply some Urban Decay Perversion Mascara. Just a head's up - it's not waterproof!

4. Eyeshadow: I don't usually wear eyeshadow, but when I do, I wear Maybelline. I love these little sets. If you flip the case over, there's a diagram for how they recommend you apply the make-up to achieve a smokey eye. Sometimes I follow their diagram; sometimes I make up my own way of applying the eyeshadow. I use my E.L.F. angled brush to apply the darker colors as liner. Sometimes, I just apply the darkest color as liner and leave it at that!

5. Lips: I'm a chapstick girl. Even for fancy events, I'm applying EOS chapstick on my way in the door.  The only time I haven't worn chapstick is for my wedding! I love e.l.f. lipsticks, particularly the Studio Moisturizing Lipstick in Wink Pink!

As we have established in previous posts, I love things that give you options! This make-up routine is quick, easy, and allows for you to customize the routine to your liking! I generally apply foundation first, then blush, and save my eyes for last. Here's my finished look: